|
Integration of FSA into support service
Follow tree steps to learn how to integrate
File Search Assistant into your support service and make support
time- and cost-effective.
1) Analyse the structure of your company's knowledgebase;
2) Setup custom search groups of File Search Assistant;
3) Download FSA to give this idea a try;
1) Analyse the structure of your company's
knowledgebase
 The
first aim is to bring the correct information at the right time to the
correct person. The
first aim is to bring the correct information at the right time to the
correct person.
Your support assistants should have an access to all information
that can help them.
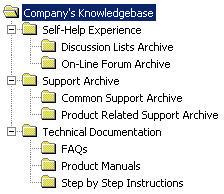
Your company already has this information (>). It is archive of
support service, technical documentation and self-help experience.
You should create some company specific structure that will let
your assistant to work with high-efficiency.
2) Setup custom search groups of Files Search
Assistant
Now you should configure FSA. It is easy and won't take much time.
Learn how to create custom search group:
|
Creating custom search group:
1) Run File Search Assistant
2) Select "Custom Search Groups" in
"Edit" menu. Then click "Add" button.
3) Now you should put necessary text in all the
fields. Comments below will help you:
"Name" - is the name of new search
group.
For example, it can be "Self-Help Experience"
or "Support Archive".
"File Mask" - mask for files you want to
search for. Leave "*.*" if you want to search for
all files.
You can specify specific extension to speed up search -
for example .pdf to search text in Adobe Acrobat files (for
example, for product manuals).
"Icon File" - specify any file you want
to use as a source of icon.
It is handy to have Adobe Acrobat  icon for .pdf manuals and htm document
  icon for archive of on-line forum.
4) Now click "Add path" button to add
search folder(s). Note: You can associate several folders
with one search group.
For example, you can add "..\Company's
Knowledgebase\On-Line Forum Archive" and
"..\Company's Knowledgebase\Support Archive\Common
Support Archive" to one search group - "Customer's
conversation archive"
5) Click "Add" button. Then click
"Close" button (if you don't want to add any other
search group).
6) Make sure new search group appeared in
"Search in" dropdown list. Selecting this search
group will prepare FSA to search in specified above
folder(s) for files with specified mask.
|
Create some search groups you want to use as a basic.
Several useful notes:
1) After usage FSA for sometime you will find the necessity to add
some more search groups. All you need is just add another search group
(or edit existence).
2) You can specify folders located on different hard disks, on
local network and even folders that contain zip archive files (FSA can
search recursively in zip archives).
|